

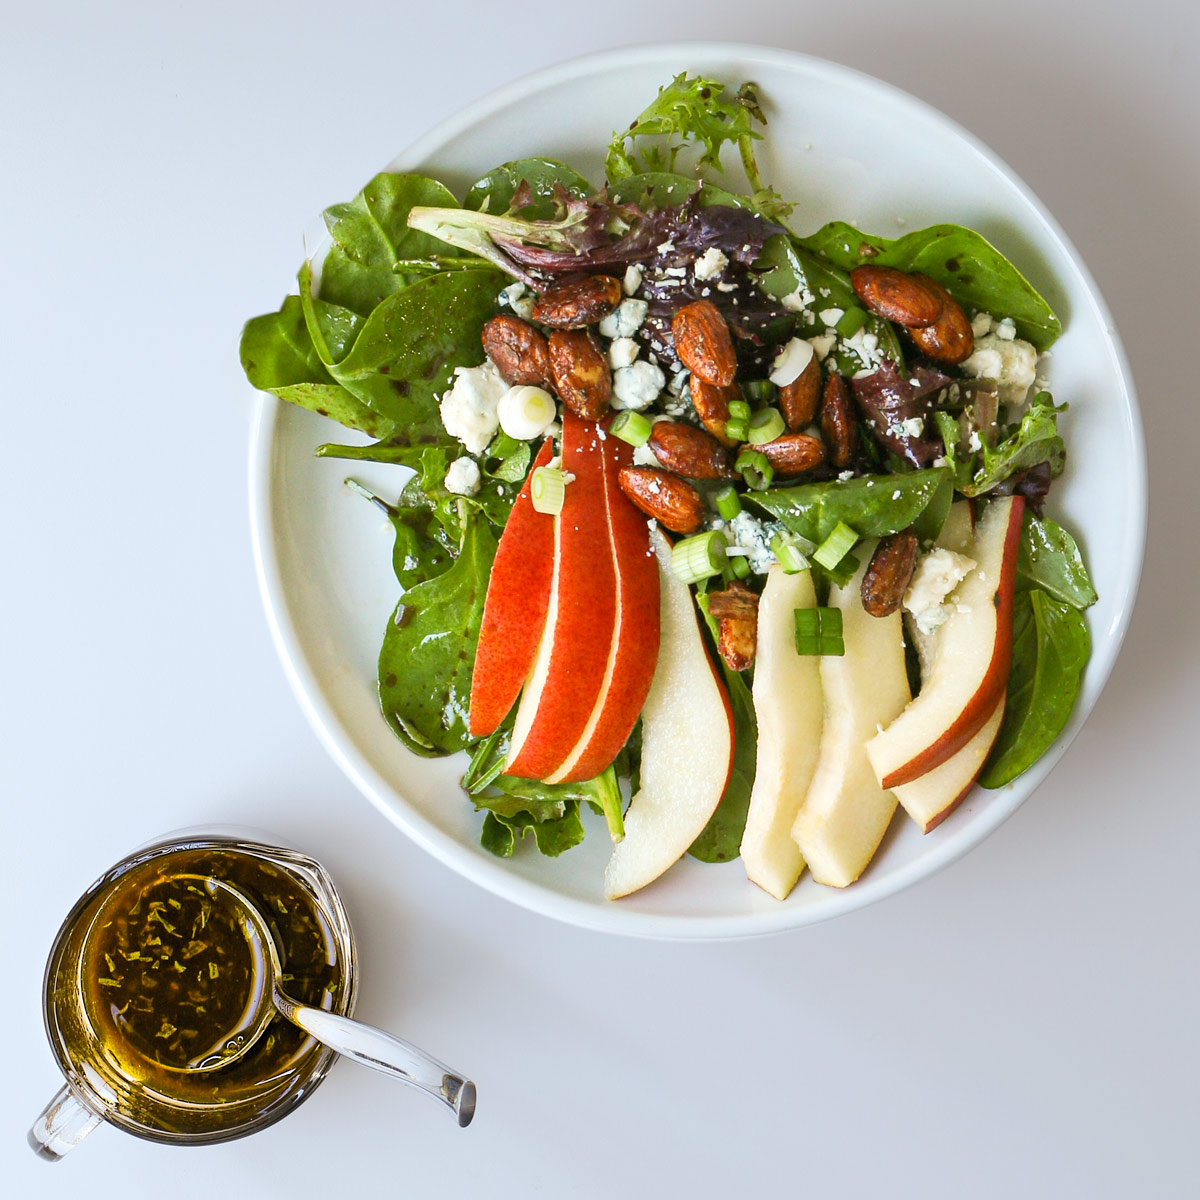
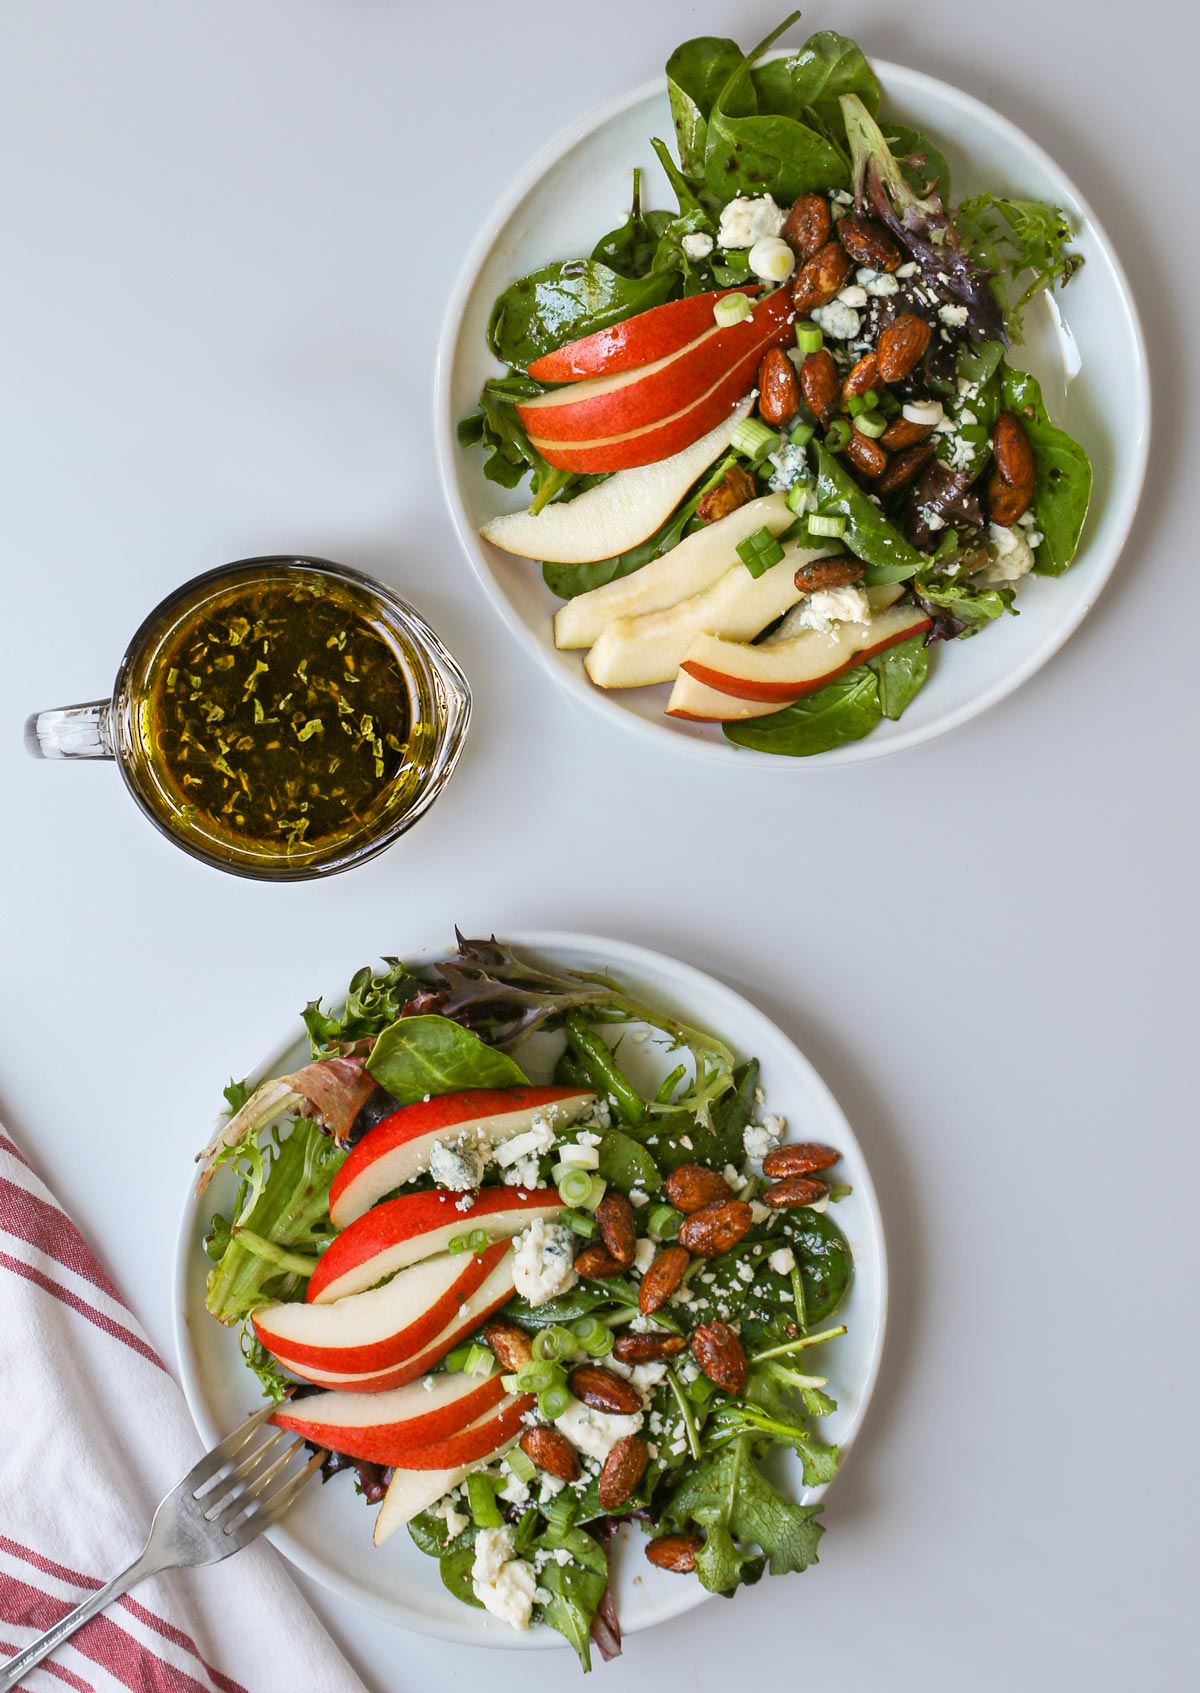
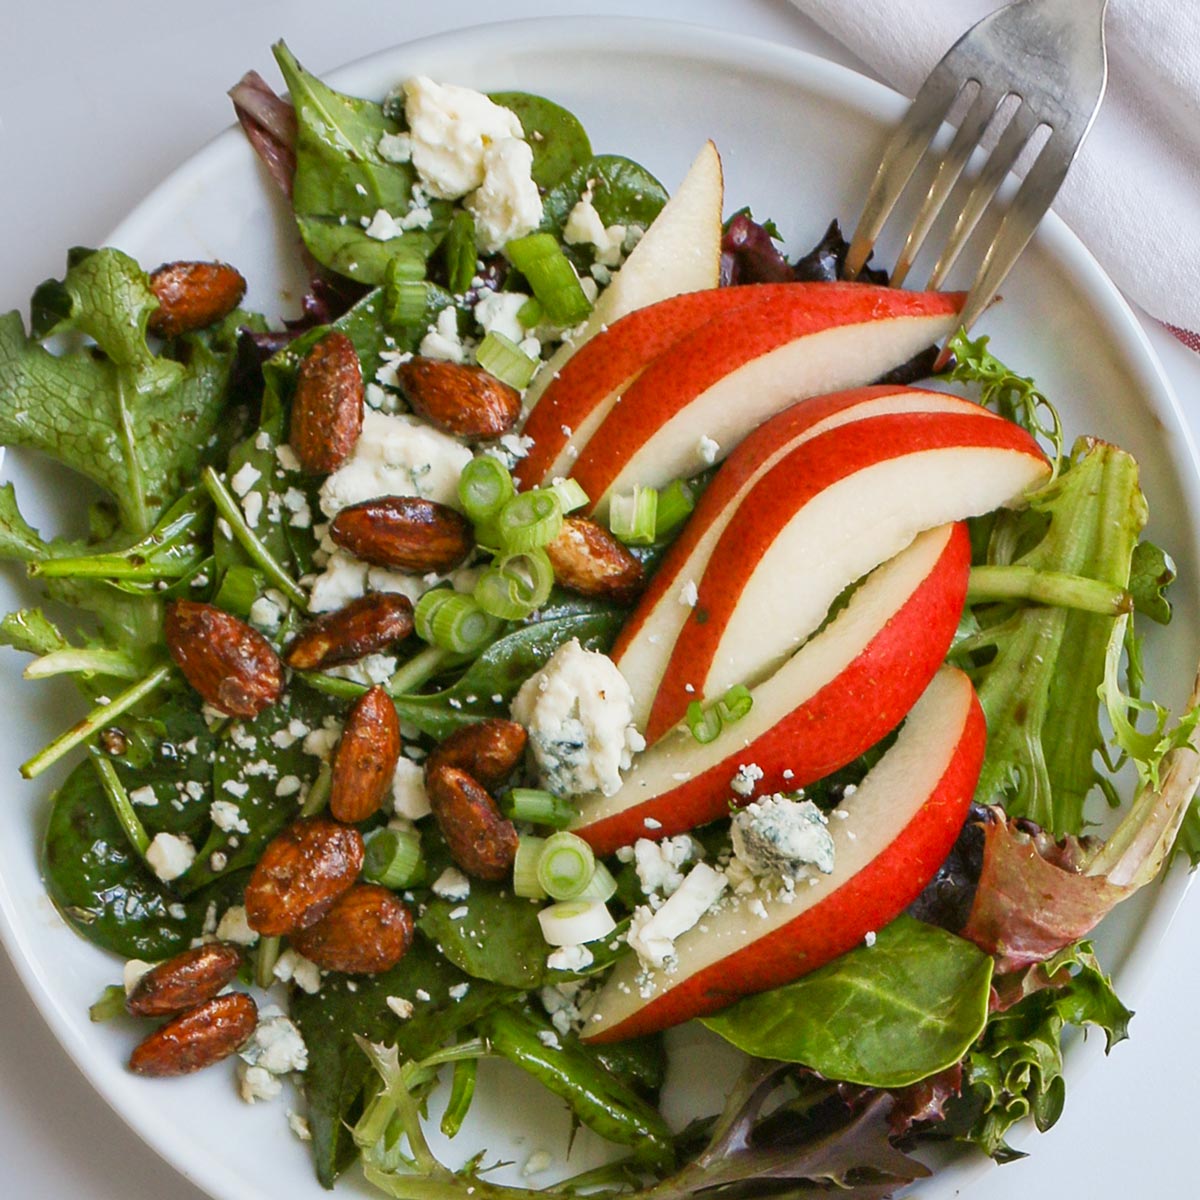
If you’re looking for a salad full of flavor, then you’re going to want to make this Pear Salad with Blue Cheese. Thinly sliced pears, sweet and spicy candied almonds, crumbled blue cheese, and a balsamic vinaigrette come together for a salad that can’t be beat.
After you’ve put this pear salad in regular rotation, be sure to try one of our other great composed salad recipes, like the Santa Fe Salad, a Buffalo Chicken Salad, or our Italian Salad. Build your own amazing flavor combination with this guide to salad toppings.

Want to save this post?
Enter your email below and get it sent straight to your inbox. Plus, I’ll send you budget recipes and money-saving tips every week!
Jump to:
Ever been to a restaurant that served an out of this world salad?
Maybe it had tangy knobs of blue cheese scattered across the top. Or maybe there were crunchy, candied bits of nuts and seeds. Or maybe there was juicy, fresh, in-season fruit that, combined with the cheese and the candied toppings, made a veritable party in your mouth.
You know those salads?
Well, this is that salad.
This Pear Salad is one that I could eat at anytime of the day, month, or year. And so should you. It’s a great romantic dinner to make at home.
Why Make This
It’s delicious! Enjoy a simple but elegant starter with this Pear Salad with Blue Cheese, Candied Almonds, and Maple Balsamic Vinaigrette.
It’s easy and make-ahead. All of the components for this pear salad can be made ahead so you can enjoy your dinner to the fullest!
It’s a great side for so many things. Add this salad to your list of things to serve with mac and cheese, your favorite casseroles, and roast meats.

Ingredients
Here’s what you’ll need to make this tasty Pear Salad with Blue Cheese:
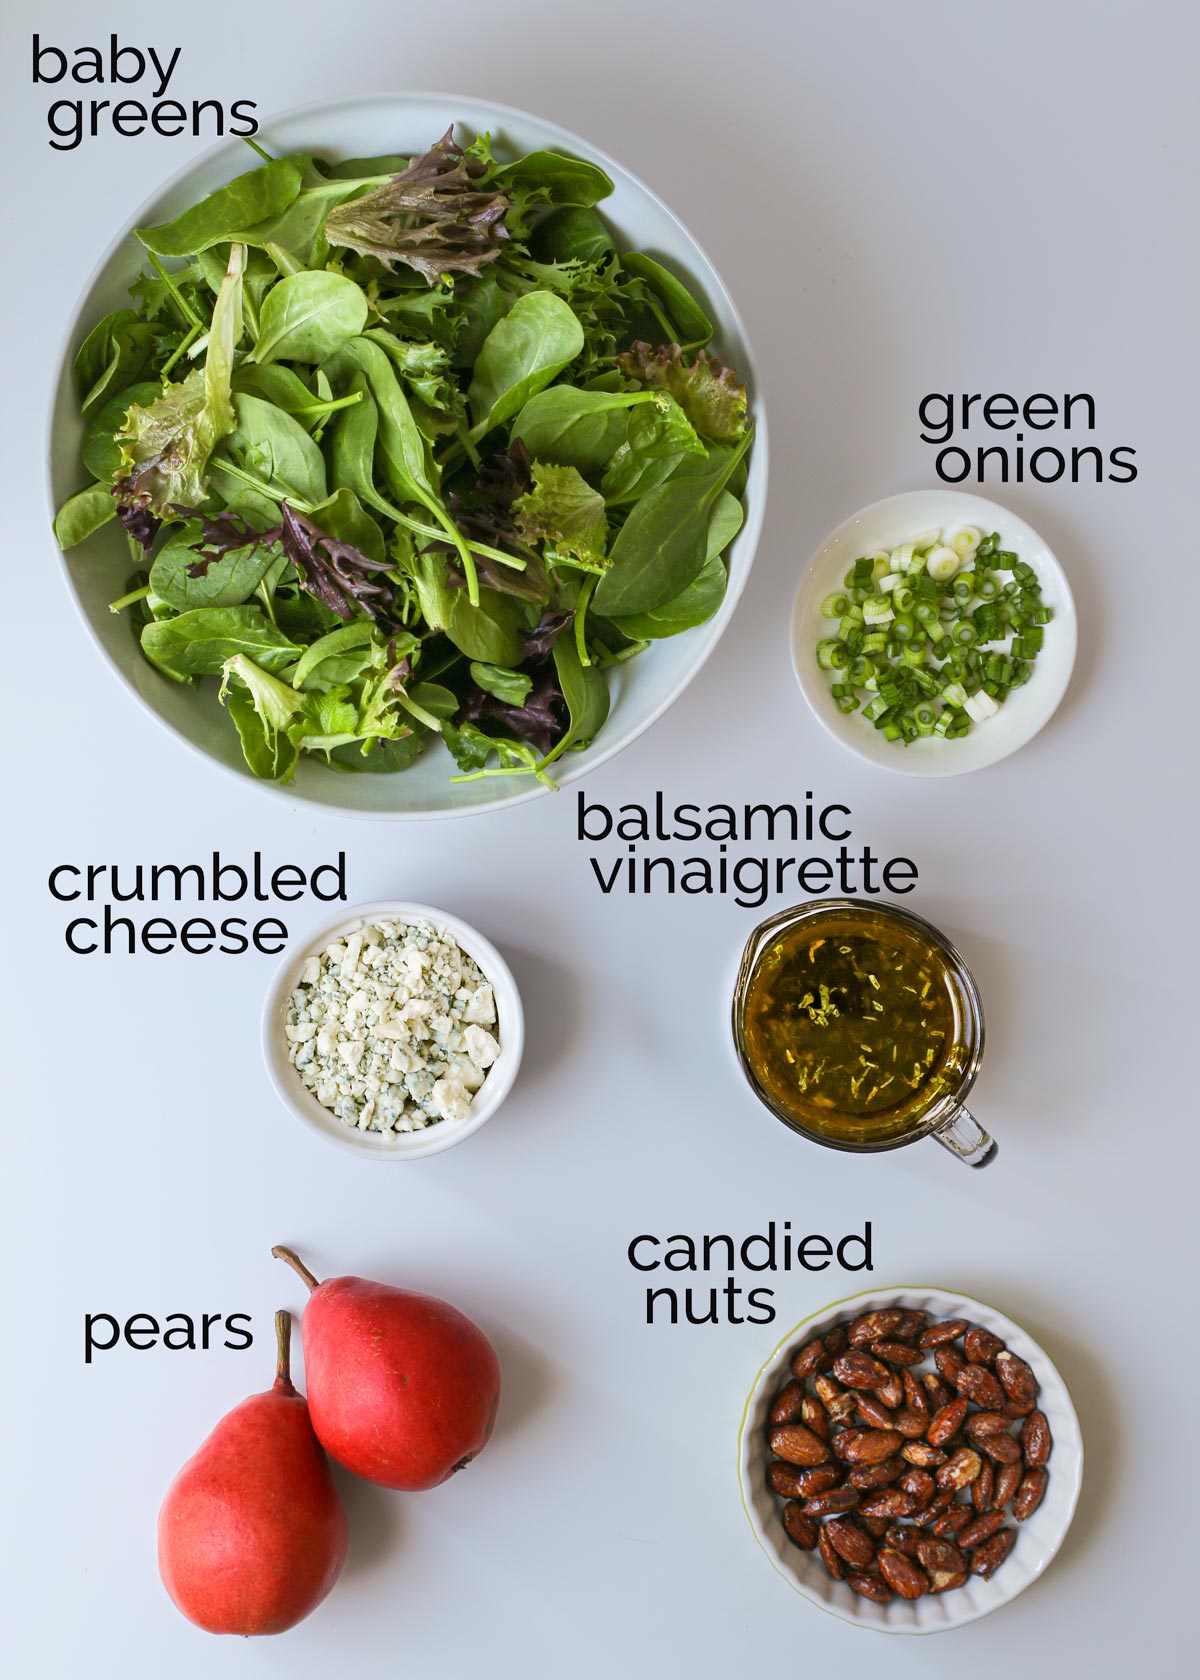
baby greens – Mixed greens are delicious in this pear salad, but you can also use baby spinach or chopped romaine, red leaf, or green leaf lettuces.
balsamic vinaigrette – I make a homemade dressing with balsamic vinegar, maple syrup, Dijon mustard and extra virgin olive oil. If you have a bottled dressing you prefer, by all means use that.
pears – you need about ½ pear per serving. You can peel them or leave the skins on for added interest. It’s really up to you.
blue cheese crumbles – I love blue cheese and gorgonzola in this pear salad, but you can also use goat or feta cheese crumbles. Or make this salad vegan by leaving off the cheese entirely. Since gourmet cheeses can be pricy, be sure to freeze extra cheese so you can stretch your purchase.
candied almonds – Spicy Candied Almonds take just a few minutes to prepare and they really take this over the top. You can use any nut or seed you like though. Shopping the kitchen saves money!
green onions – I love the bite that chopped scallions add to the salad.
Variations
Feel free to add any of the following to this pear salad based on what you have on hand: crumbled goat cheese, crumbled feta cheese, candied walnuts, candied pecans, dried cherries, dried cranberries, raisins, or pomegranate seeds (arils). Grilled or roast chicken, turkey, or pork are also good proteins to make this a heartier pear salad.
Pro tip: if you omit the blue cheese, this makes a great kid-friendly Thanksgiving side dish.
Step-by-Step Instructions
Here’s how to make Pear Salad with Blue Cheese:
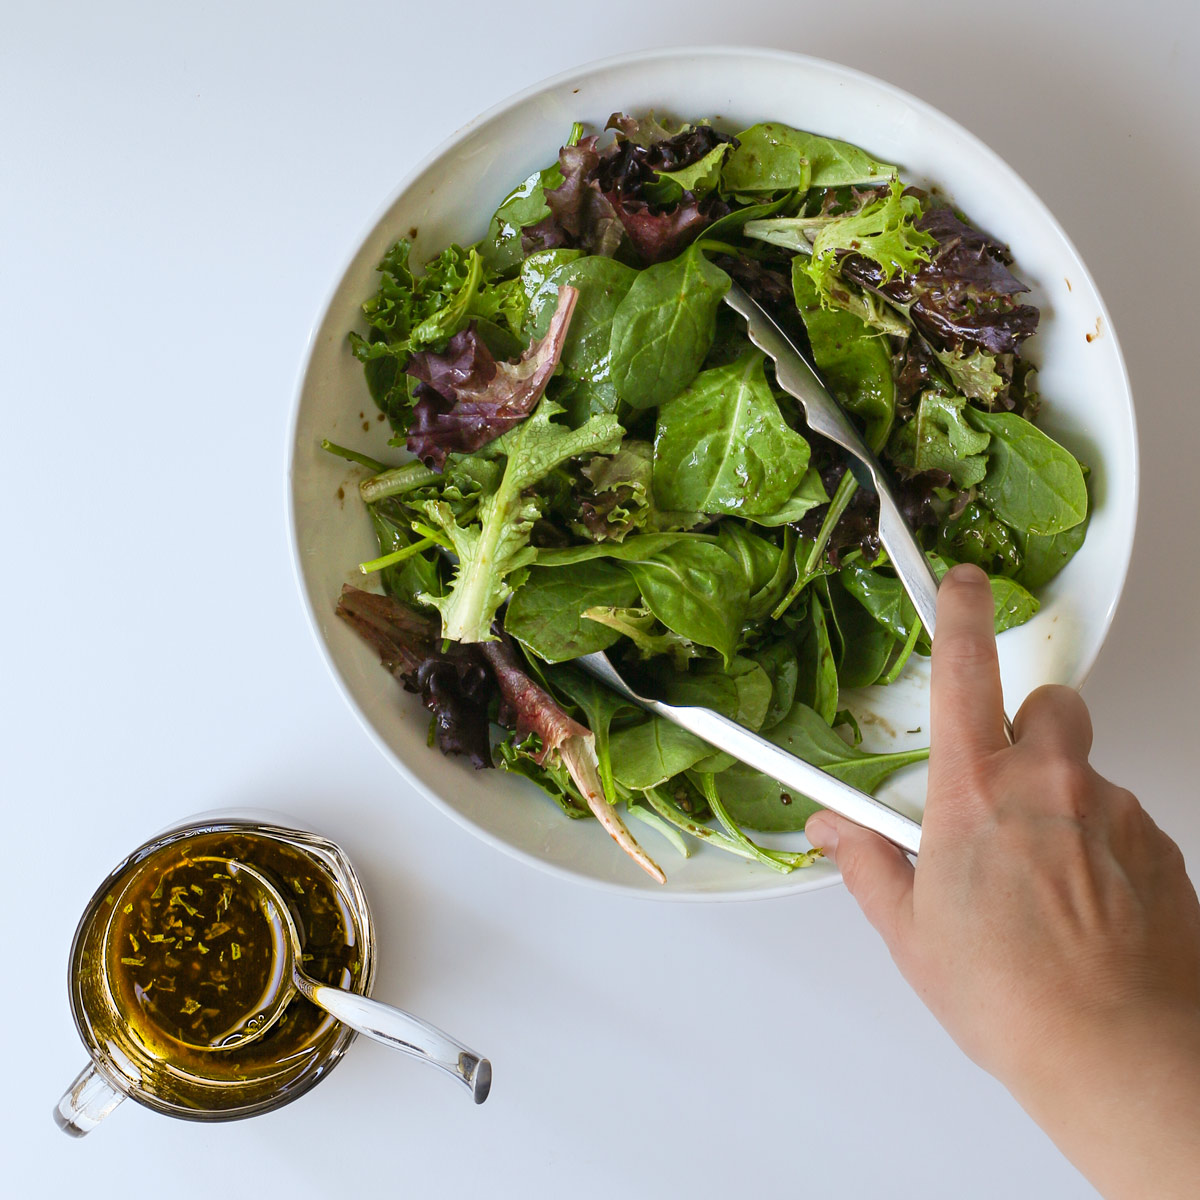
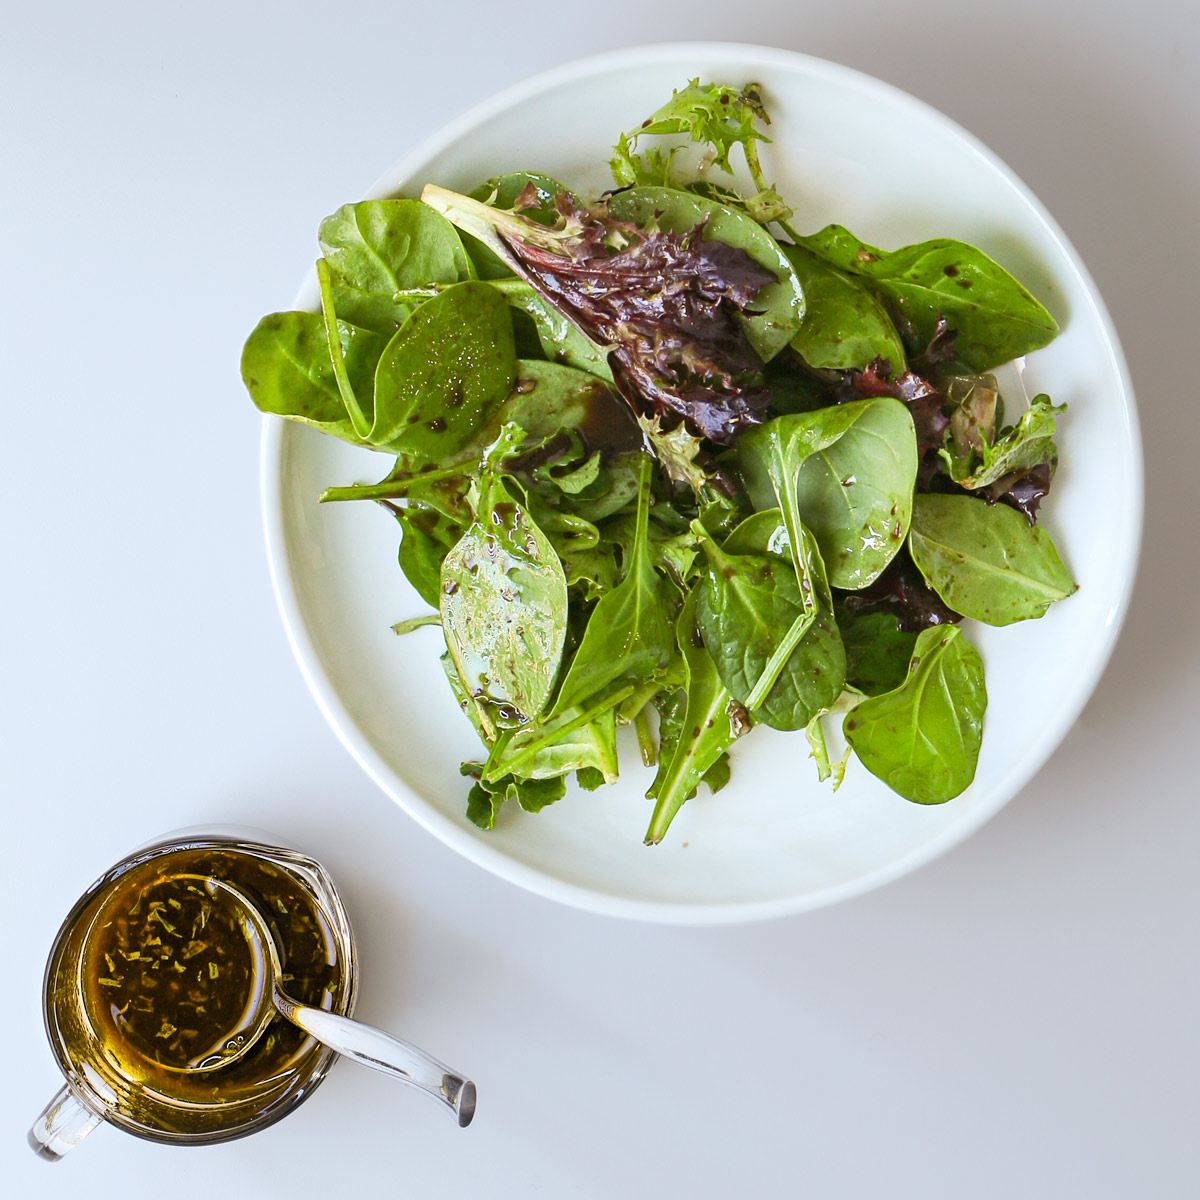
- In a large bowl combine the salad greens and enough dressing to coat. Divide the greens among 4 salad plates.
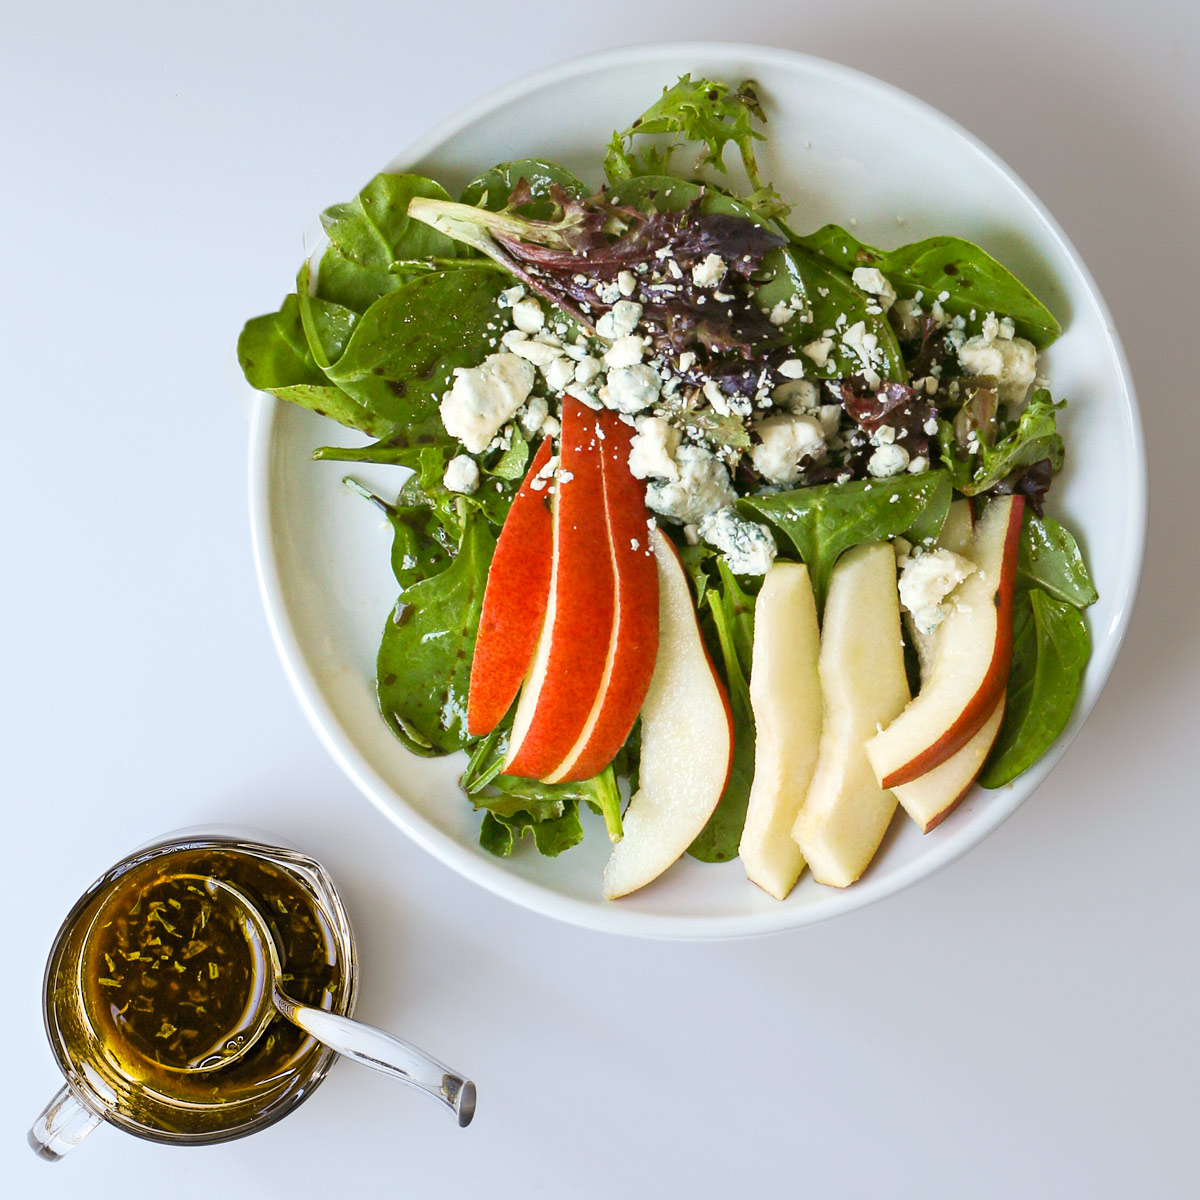
- Divide the pear slices among each bed of greens. Sprinkle with the blue cheese crumbles, about 2 tablespoons per plate.
- Sprinkle 2 tablespoons almonds over each plate along with 1 tablespoon scallions. Serve immediately with freshly ground black pepper.
FAQs
There are over 5,000 varieties of pears available world wide. Bosc, Bartlett, Anjou, and Comice are the most commonly sold in the US. The type you choose for your salad will depend on the texture and flavor you prefer. Check out this chart of pear varieties to select the best one for you.
While pears are available affordably all year round, they are in season from late July to early spring, depending on where you live and what variety you’re looking for. Choose pears that smell good and don’t have visible dents or bruises. It’s best to buy rock hard pears (they are picked hard) and let them ripen at home. Ripe pears can bruise significantly just on the way home from the store.
Pears should be stored at room temperature until ripe and then refrigerated once ripe.
More Great Salad Recipes
Tell us what you think!
We love to hear your experiences with Good Cheap Eats. Click the STARS on the recipe card or leave a STARRED comment to let us know what you think of the recipe.
Pear Salad with Blue Cheese and Candied Almonds
Equipment
- salad bowl
- cooking tongs
Ingredients
- 6 cup baby greens
- 1 balsamic vinaigrette
- 2 pears peeled, cored and cut into ⅛s
- 2 oz blue cheese crumbles (½ cup)
- ½ cup Spicy Candied Almonds
- ¼ cup chopped green onions
Instructions
- In a large bowl combine the salad greens and enough dressing to coat. Divide the greens among 4 salad plates.6 cup baby greens, 1 balsamic vinaigrette
- Nestle ¼ the pear slices atop each bed of greens. Sprinkle with the blue cheese crumbles, about 2 tablespoons per plate.2 pears, 2 oz blue cheese crumbles
- Sprinkle 2 tablespoons candied almonds over each plate along with 1 tablespoon scallions. Serve immediately.½ cup Spicy Candied Almonds, ¼ cup chopped green onions
Notes
Nutrition
This post was originally published on November 9, 2011. It has been updated for content and clarity.

Lynn from NC Outer Banks
Oh Jessica, this is so good! I made a few substitutions (apples for pears and honey roasted peanuts for the pepitas). My husband and I both loved it despite my husband (who is becoming pickier with age!) proclaiming multiple times through recent years that he didn’t like blue cheese. Instead of crumbles I grated a chunk of blue cheese my daughter brought during a visit and left. He didn’t look closely enough to realize it was blue cheese and ate every bit of his salad. I’ve actually fixed it again because we both liked it so much and I came clean about the blue cheese, which definitely surprised him. The next time we have some of our family visit, this will definitely be the salad served. Thank you for sharing. Delicious!
Jessica Fisher
Yay! So glad you enjoyed it, Lynn. Thanks for taking the time to comment, and I’m so glad you’ve won him to the Bleu side. 😉
Jennifer
That looks so good. I’m eating some maple-spiced pepitas as I’m reading this! Thanks so much for the recipe, they are delicious!
Jessica Fisher
So glad you like them!
Jeanine
Thanks for the multicultural shout out! Growing up, we would not only have our Thanksgiving turkey, but we would also have homemade pasta, ravioli and gnocci. (And salad last. 🙂 talk about carbo overload!
Food on the Table
Not usually a big salad eater on Thanksgiving but I love the idea of a LIGHT dish with the big feast. And pears on top, yum! Might have to try a version of this this year.
Kristia@Family Balance Sheet
I didn’t grow up with salad on the Thanksgiving table either, but that is one of the dishes that I am taking. I think it is time to break tradition…my family will get over it.
Thanks for hosting the linky. I posted a favorite fall side dish that would work well with a smaller crowd: http://www.familybalancesheet.org/2011/10/cranberry-walnut-acorn-squash-bowls.html
Jen Blacker
Thank you for hosting. I shared my smashed potato gratin recipe. Thanksgiving is coming up so fast I really need to get organized! So many great recipes posted today.
Kristy @ Almost On Purpose
You had me at the title! I was NOT a fan of blue cheese until having it with pears in a salad.
Cris
I have not been a big salad eater for the majority of my life… but recently I discovered homemade dressings and I can’t get enough salad! I am definitely going to check out your dressing recipes 🙂 Thanks for sharing!
Heidi C
YUM! That looks so good! And except for the greens, I have everything in the house to make it!